

goconvey是一个非常好用的Go测试框架,本文将深入探讨goconvey的测试用例执行顺序。
前言
goconvey直接与go test集成,提供了很多丰富的断言函数,能够在终端输出可读的彩色测试结果,并且还支持全自动的Web UI。本文将深入探讨goconvey的测试用例执行顺序。
代码验证
执行顺序
先说结论,Convey按照树形结构深度遍历顺序执行的。
为了验证Convey的执行顺序,我们可以编写以下代码。
func TestConvey(t *testing.T) {
    Convey("L1", t, func() {
       Println("L1")
       Reset(func() {
          Println("End|")
       })

       Convey("L2-1", func() {
          Println("L2-1")

          Convey("L3-1", func() {
             Println("L3-1")
          })

          Convey("L3-2", func() {
             Println("L3-2")
          })
       })

       Convey("L2-2", func() {
          Println("L2-2")
       })
    })
}
执行后,以上代码将打印:
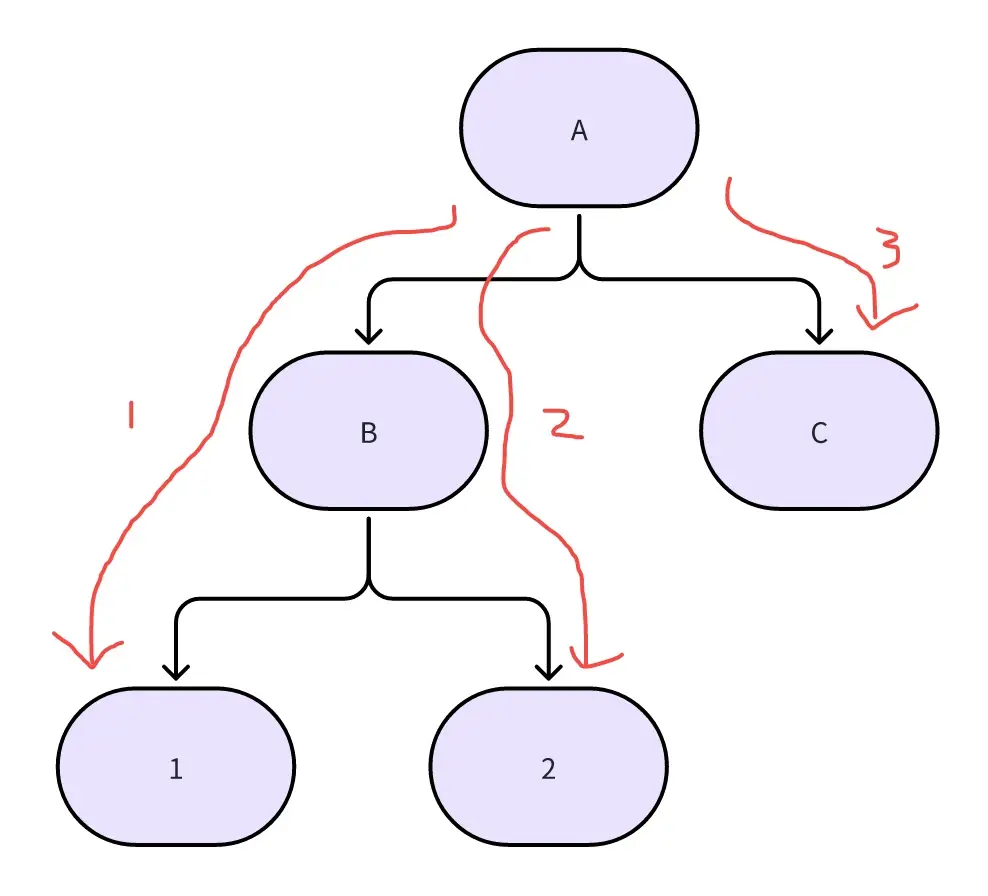
L1L2-1L3-1End|L1L2-1L3-2End|L1L2-2End|
可以看到,如果将Convey函数当成一棵树,那么执行顺序类似于深度遍历。如下图所示。
那么结合Reset函数,就可以实现"SetUp"和"TearDown"模式。
并发性
网上有些文章说嵌套的同级Convey是并发执行的,但实际上并非如此。
为了测试并发性,我们可以编写如下测试代码:
func TestConvey(t *testing.T) {
    Convey("L1", t, func() {
       Println("L1")
       Reset(func() {
          Println("End|")
       })

       Convey("L2-1", func() {
          time.Sleep(1000 * time.Millisecond)
          Println("L2-1")
       })

       Convey("L2-2", func() {
          Println("L2-2")
       })
    })
}
以上代码中,子测试L2-1睡眠1秒后再打印L2-1,而子用例L2-2并不会睡眠,假如Convey是并发执行的,那么应该先打印L1L2-1End|,再打印L1L2-2End|。而实际上,以上代码仍然是打印L1L2-1End|L1L2-2End|,且在执行时能明显地感受到控制台打印L1之后睡眠一段时间再打印L1L2-2End|。
在github issue 中,作者也表明子用例目前没有办法并发执行。
There’s currently no way to allow Convey suites to run in parallel (just top level TestXxx functions). However I’m slowly working on a change to the Convey internals to fix this.
目前还没有办法允许 Convey 套件并行运行(只有顶级 TestXxx 函数)。不过,我正在慢慢地对 Convey 内部进行更改以解决此问题。
顶级测试函数可以并发执行,需要利用t.Parralel()函数,如下述代码所示:
func TestConvey(t *testing.T) {
    t.Parallel()
    Convey("A", t, func() {
       Println("A")
       Reset(func() {
          Println("End")
       })

       Convey("B", func() {
          time.Sleep(3000 * time.Millisecond)
          Println("B")
       })

       Convey("C", func() {
          time.Sleep(10 * time.Millisecond)
          Println("C")
       })
    })

    Convey("D", t, func() {
       Println("D")
    })
}

func TestConvey2(t *testing.T) {
    t.Parallel()
    Convey("E", t, func() {
       Println("E")
       Reset(func() {
          Println("End")
       })
       time.Sleep(3000 * time.Millisecond)
    })
}
假设当前包中只存在测试函数TestConvey和TestConvey2,执行该包的测试用例时,运行时间大概在3s左右。假如去掉 t.Parallel(),单测运行时间将会增加到6s左右。
深入理解
以下文字将从代码角度,深入解释为什么Convey会使用dfs顺序执行且无法并行。
入口函数
Convey包的入口函数Convey代码如下:
func Convey(items ...any) {
    if ctx := getCurrentContext(); ctx == nil {
       rootConvey(items...)
    } else {
       ctx.Convey(items...)
    }
}
函数区分了根Convey与子Convey。每个Convey块会动态创建树中的一个节点,并将其挂载到当前上下文对应的父节点下。
上下文管理
上下文 是Convey实现树形结构的核心。
type context struct {
        reporter reporting.Reporter

        children map[string]*context

        resets []func()

        executedOnce   bool
        expectChildRun *bool
        complete       bool

        focus       bool
        failureMode FailureMode
        stackMode   StackMode
}
上下文管理用到了gls。gls 是一个开源库,用于在 Go 中实现协程(goroutine)本地存储(类似于线程本地存储,TLS)。每个 Convey 块的执行依赖上下文栈来跟踪父子关系和共享状态,而这些信息必须在多个 goroutine 中安全地传递和管理。
当Convey为根节点时,将执行以下代码。
func rootConvey(items ...any) {
        entry := discover(items)

        if entry.Test == nil {
                conveyPanic(missingGoTest)
        }

        expectChildRun := true
        // 构建上下文
        ctx := &context{
                reporter: buildReporter(),

                children: make(map[string]*context),

                expectChildRun: &expectChildRun,

                focus:       entry.Focus,
                failureMode: defaultFailureMode.combine(entry.FailMode),
                stackMode:   defaultStackMode.combine(entry.StackMode),
        }
        // 设置goroutine上下文
        ctxMgr.SetValues(gls.Values{nodeKey: ctx}, func() {
                ctx.reporter.BeginStory(reporting.NewStoryReport(entry.Test))
                defer ctx.reporter.EndStory()
                // 检查当前上下文是否仍有未运行的测试逻辑(子用例)。
                for ctx.shouldVisit() {
                        ctx.conveyInner(entry.Situation, entry.Func)
                        expectChildRun = true
                }
        })
}

// 如果“用例未完成”且“仍然存在子用例”
func (c *context) shouldVisit() bool {
        return !c.complete && *c.expectChildRun
}
如果根Convey的func中仍然存在Convey,那么会执行根节点的Convey方法,注意RootConvey方法将会改变上下文nodeKey的值,此时如果子Convey中依然存在Convey,那么会从入口函数中读取到子Convey的上下文,以此递归,实现了DFS的遍历功能。
而如果在Convey中不存在Convey了,那么该函数便会执行完毕并退出。
注意到RootConvey中使用了for循环来执行func,此时RootConvey的func会继续执行,但已经执行过的Convey会被跳过。
func (ctx *context) Convey(items ...any) {
        entry := discover(items)

        // we're a branch, or leaf (on the wind)
        if entry.Test != nil {
                conveyPanic(extraGoTest)
        }
        if ctx.focus && !entry.Focus {
                return
        }

        var inner_ctx *context
        // 判断是否执行过
        if ctx.executedOnce {
                var ok bool
                inner_ctx, ok = ctx.children[entry.Situation]
                if !ok {
                        conveyPanic(differentConveySituations, entry.Situation)
                }
        } else {
                if _, ok := ctx.children[entry.Situation]; ok {
                        conveyPanic(multipleIdenticalConvey, entry.Situation)
                }
                inner_ctx = &context{
                        reporter: ctx.reporter,

                        children: make(map[string]*context),

                        expectChildRun: ctx.expectChildRun,

                        focus:       entry.Focus,
                        failureMode: ctx.failureMode.combine(entry.FailMode),
                        stackMode:   ctx.stackMode.combine(entry.StackMode),
                }
                ctx.children[entry.Situation] = inner_ctx
        }

        if inner_ctx.shouldVisit() {
                ctxMgr.SetValues(gls.Values{nodeKey: inner_ctx}, func() {
                        inner_ctx.conveyInner(entry.Situation, entry.Func)
                })
        }
}
goconvey无法实现根Convey中的各子场景并发运行,一个原因是在源码中,gls仅记录了一个Convey上下文信息,在深度遍历时会更新gls的nodeKey为当前Convey的上下文信息。
本文将通过一个场景来解释Convey是如何在执行完叶Convey之后,又会从RootConvey开始执行。
以下代码,ConveyC2会断言失败。
func TestConvey(t *testing.T) {
    t.Parallel()
    Convey("A", t, func() {
       Println("A")
       Reset(func() {
          Println("End")
       })
       a := 1

       Convey("B", func() {
          Println("B")

          Convey("C", func() {
             Println("C")
             So(a, ShouldEqual, 1)
             a++
          })

          Convey("C2", func() {
             Println("C2")
             So(a, ShouldEqual, 2)
          })
       })
    })
}
因为ConveyC运行完成之后,函数会执行到Convey-C2,但此时Convey-C2并不会执行,只会将自己添加到ConveyB之下,然后便退出了,因为执行完ConveyC之后,ConveyC的expectChildRun值变为了false,不满足继续dfs的条件(即shouldVisit()为true),因此会返回。
ConveyA作为RootConvey,会一直for循环,直到所有情况均执行,每次for循环会将expectChildRun设置为true,所以又会重新走一遍AB。
为什么B还会执行呢?不是B结束的时候已经将expectChildRun设置为了false吗?因为ConveyB的expectChildRun与ConveyA的expectChildRun是同一对象,所以ConveyA对expectChildRun的改动同时会影响ConveyB。
ConveyC已经运行完成(即Completed为true),因此会跳过ConveyC,执行ConveyB的子用例ConveyC2,因为ConveyC并没有执行,所以a的值仍然是1。
为什么使用gls
为什么使用gls,而不使用go原生提供的context.Context包来传递上下文信息?
我猜想是goconvey早期确定了使用gls来隐式传递上下文,并且当前实现已经足够成熟和稳定。如果切换到 context.Context,可能需要重构底层逻辑,且带来额外的维护复杂性。
为了佐证我的猜想,我找到了作者在某个Issue 中的回答,如下:
Aside: I think really the better thing to do in this modern age is to stop using “goroutine local storage” altogether.
The next evolution of goconvey should rely entirely on explicit context passing instead - hiding the test context in a global variable just ends up causing confusion and bugs :/… Unfortunately such a change will be backwards incompatible which is why I haven’t implemented it here.
旁白:我认为在现代,最好的办法是完全停止使用“goroutine本地存储”。goconvey的下一个进化应该完全依赖于显式的上下文传递——将测试上下文隐藏在全局变量中只会导致混乱和错误:/。。。不幸的是,这样的更改将是向后不兼容的,这就是为什么我没有在这里实现它。